Cura Profile Setting for Lithophane 3D Print
We talked about how to 3D print pictures as lithophanes in the previous articles and listed a series of matters and attention about lithophane 3D print. In this article, we will introduce you in details of 3D print lithophane. And we will go deeper about the settings when 3D printing images.
Generate the 3D Photo Using Cura
Ultimaker Cura, one of the most popular slicing applications we used for 3D printing, is capable of generating lithophane. In this way, it’s no need for other application or website, we can turn our 3D printer into a lithophane generator with the Cura.
To generate a 3D model from an image, we need to open an image instead of a 3D file in the Cura. Once the image is loaded, a setting window will pop up where we can set the parameter of the generated lithophane 3D model.

The Height parameter refers to the maximum thickness in the lithophanes. The higher the parameter is, less light will go through, and the darker the dark areas are. The Base parameter refers to the minimum thickness in the lithophanes. And the same, the lower the minimum thickness is, the brighter the light areas are.
If you want to print the lithophane standing up, the Base parameter must be set equal to or greater than your extrusion width. Take Anet machine as an example, the paremeter must be at least 0.4 or 0.5 mm for a 0.4mm nozzle.
The Width and Depth is used to adjust the size of the lithophane. Just make sure it's within the print volume of your printer.
Stick the Smoothing bar to far left. Anything more than the slightest smoothing will blurs the image.
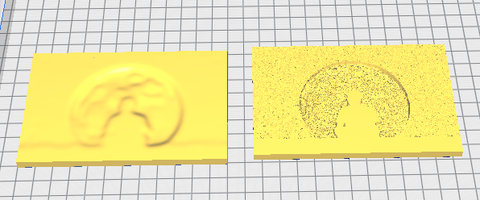
Maximize (left) and minimize (right) the Smoothing
Set the infill up to 100% for Lithophane Print
Usually, we use 20% standard infill setting. But if you use 20% infill to print your lithophane as your ordinary 3D print, you will see a bunch of gridded lines when light shining through your lithophane. Instead, you need to set the infill to 100% for a solid interior structure.
Another possibility is to increase the number of walls and reduce the infill percentage to 0%. By doing this, your lithophane will become a wall and all printing lines will follow the contours of the lithophane. You can set the number of walls to maximum thickness / 2. The division of 2 is because we have walls on both sides of the lithophane. Let’s say, a 3 mm Height, the walls can be set to 2 mm.
Minimum Layer height for Lithophane Print
Layer height is one of the most important parameters in determining the quality of your final lithophane. The lower layer height you go, the better it will be for the quality of the lithophane. The specific parameter affected by the printer you use.
For Anet 3D printer, we recommend a layer height of 0.12 mm, which is a perfect choice for us between the quality and the time it takes to print a lithophane. We use 0.12 mm instead of 0.1 mm because that the incraments of Anet 3D printer for the Z-axis is 0.04 mm. 0.04 mm fits perfectly in 0.12 mm without having to round.
Slower Print Speed for 3D Phone Print
Generally, we can get a pretty good result with about 50 mm/s print speed. With so much details in a lithophane, a slow speed of 20 mm/s – 35 mm/s will ensure no detail is lost and the printer takes the time it needs to get good inter-layer adhesion.
Printing standing up along Y-axis
There is a last setting you need to consider before starting to print, the printing orientation.
The first option is between printing your lithophane laying flat and standing up on the bed. Print lithophanes laying on the bed will end up with low quality, as each layer is printed it the filament is squished into the printer bed.
When printing lithophanes standing up, there comes the second option, to print it along Y-axis or X-axis.
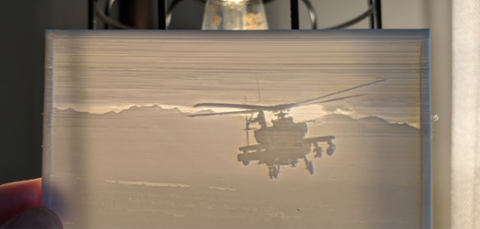
Printed along X axis
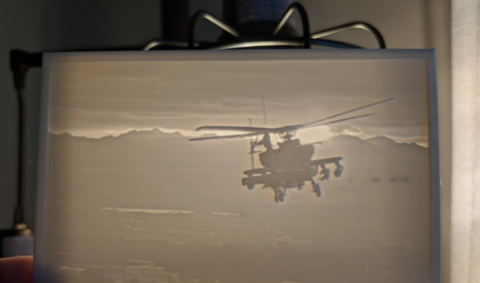
Printed along Y axis
It’s obvious from the comparison of two lithophanes above, printing along Y-axis is better. What’s the reason?
When printing along X-axis, the hot end moves left to right. As the Z-axis moves up, the print becomes less and less stable and prone to vibration, resulting in lines and uneven layers.
When printing along Y-axis, the bed moves front to back, and most of movement and vibration is transferred to the gantry.
This is the Cura profile that helps perfect your 3D print photo. You can 3D print your lithophane lamp with high quality. Your 3D printer can be a lithophane maker far beyond your imagine.
Leave a comment