Lithophane 3D Print: How to Make 3D Print Pictures
3D print pictures are good ideas as gifts for friends and family. You can customize your own lithophane with your 3D printer. We will show you how to turn your 3D printer into a lithophane generator and make a lithophane photo and lithophane lamp.
Choose a picture appropriate for 3D printing
A lithophane is an embossed photo generated by a 3D printer. It’s a 3D image that uses the thickness of the print to show varying shades of grey when illuminated from behind. The thinner areas allow more light to pass through, appearing lighter, while the thicker areas appear darker.
A simple image, not too much detail, with a fairly high contract ratio, is more likely to yield better results when choosing the picture. Also, keep in mind that image pixel and the size of the lithophane will affect the print quality. It’s better to be a portrait with a uniform background.

This scenery picture is shown as a bad example. After converted into black and white, the most detail of the mountain has lost. And more details will disappear after printed.
Generate the 3D model from the Picture
Ever since Photoshop CS5, there are several features have been added to help with turning a 2D object into 3D so that we can use Photoshop to create a lithophane.
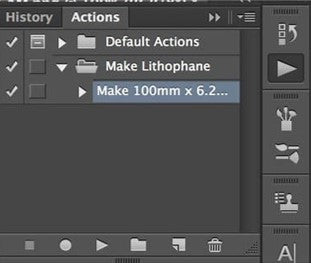
To get started, download the “Make lithophane" action set. Unzip the file, drag and drop the .atn file onto your photoshop window to install it. And then, check the Actions window by opening Window > Actions, you should see “Make Lithophane” in your actions list.
Since the action set is ready, now open your picture and run the “Make Lithophane” by clicking the play icon beneath.
You will be able to see your lithophane after a series of actions of Photoshop. The actions will take some time depending on your system spec. To avoid the software crashing, you better be patient and don’t click on anything during this time.
For exporting your work, find the Properties window by going to 3D > 3D Print Setting. Set the values as shown below:
- Set “Print To” value to Local.
- Set “Printer” value to Export STL.
- Set “Printer Volume” to Millimeters.
- Set “Detail Level” to High.
- Set ”Scene Volume” to your desired size. Just don't exceed the print volume of your 3D printer.
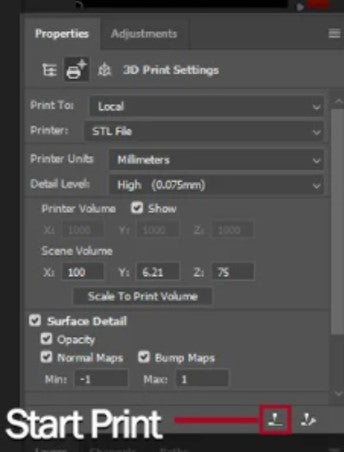
At last, press the “Start Print” button from the bar beneath and wait for some time, your 3D lithophane will be available in STL format.
There is an alternative method using online called 3DP Rocks that can straighten your learning curve.
You just need to click the “Images” tab on the top of the website to upload your image. Your lithophane will be ready as soon as you return to the model tab. After a few settings that meet your need, you can click the “Download” button and get your STL file.
Slicer Settings for Lithophane Print
We intruduced detailed cura settings for lithophane in another blog. Keep it simple, here a few settings you should keep in mind:
- The infill set we suggest to take 100% for lithophane 3d photo print.
- Use the lowest layer height your printer support.
- Print as slowly as you can for more detail.
- Do not scale the model.
It’s better to use an SD card instead of the USB connection due to lots of details on some layers that the USB connection may not fast enough to send all the G-code to the printer so it will start taking pauses while it’s receiving the G-code over USB. These small pauses will leave blobs of oozing in the print that will affect the quality of the overall result.
Get more Colors into your Lithophane
In order to get the best effect of the grey of shades, the white filament is mostly used for printing lithophane. But in some cases, you may look for something more interesting with colors. You can just print a colorful picture as size as your lithophane, and attach it to the back of the lithophane.
Print your customized Lithophane Lamp
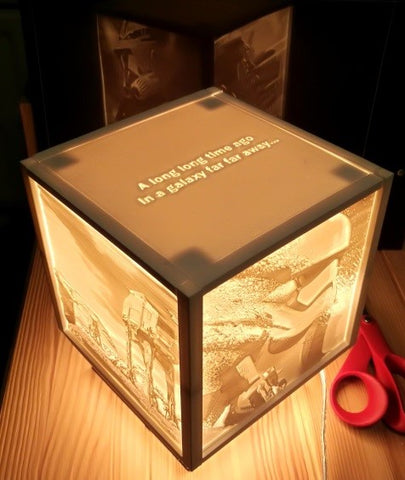
Now there you have it! Your exclusive 3D print picture! Your 3D printer has become a lithophane maker. Next step, you just need to print 5 more photos this way and glue them together as a cube. Put a LED strip light inside, you can get your customized lithophane lamp. On Lithophane Maker, there are a few more shape of lithophane lamp you could choose except for cube one.
Leave a comment