3D Printing Material Guide - How to Print PETG with Anet 3D Printers
For those Anet 3D printer users who become accustomed to print with PLA, they may doubt if the Anet ET4 and Anet ET5X series 3D printer can print PETG filament. And if it can, then how to set printing parameters becomes another question. Today, we’ll learn how to print PETG with right cura settings, including bed temperature, print temperature, on Anet ET4 and ET5 series 3D printers.
Advantages of PETG Filament Print
We'd like to start from introducing the advantages of PETG print compared with other 3D printing filaments.
- Better layer adhesion: PETG will be stick after heated, which provides a better layer adhesion to the prints.
- Higher-strength: PETG offers more toughness and impact resistance. Therefore, it has better performance in post-production.
- Less likely to shrink or wrap: PETG easier to print because it shrinks and wraps less than filaments like PLA or ABS. It’s the better choice for a large item.
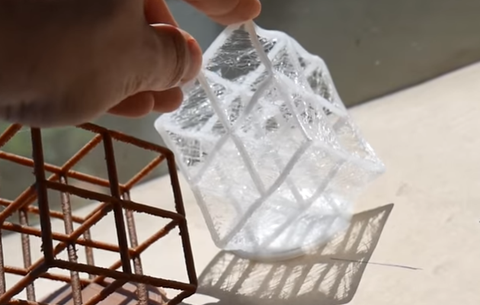
- Glass-like quality: The glycol added to the PETG helps the material be more transparent. PETG allows you to print transparent objects with smooth and glossy finishes.
- UV resistance: Compared with PLA, PETG performs more toughness and yellowing preventing after long-time sunniness.
- Chemical resistance: The glycol also provides PETG a high amount of chemical resistance, which means it will be more durable and long-lasting even with harsh sanitizing measures.
- Heat resistance: With higher glass transition temperature, PETG is not so easy to melt or deform as PLA does.
- Environmentally friendly: PETG has no styrene and emits less toxic fumes than PLA or ABS. It is also recyclable, which can be recycled through traditional means.
The Glass Transition Temperature of PETG
What is glass transition temperature?
The glass transition temperature is totally a different measure from the melting point and ideal nozzle temperature.
The melting point is the temperature at which the solid material begins to melt into a liquid.
The glass transition temperature is the temperature at which rigid solid changes into a rubbery state. It’s lower than the melting point.
The value of ideal nozzle temperature is usually a little higher than the melting point of the printing filament.
Higher Glass Transition Temperature, Better Heat Resistance
A higher glass transition temperature means it will take a longer time for the material to turn from a solid to a glassy state.
We can tell from the definition of the glass transition temperature, if a filament is above its glass transition temperature, it is in a glassy state and start to deform. Therefore, a higher glass transition temperature also means better heat resistance of the material.
A deformed PLA print
The prints may be easy to melt if the glass transition temperature of the material is too low. Don’t leave the part printed by PLA in a car on a hot summer day, the part will deform.
We can tell from the table above, the glass transition temperature of PETG is between that of PLA and ABS, which means that PETG is more durable in high-temperature conditions than PLA and more flexible than ABS.
I - Get the Right PETG Printing Temperatures
To print PETG with higher strength (than PLA), we need to set higher temperature for both the nozzle and the hotbed to ensure a better melt and deposit result for the material.
Recommended temperature settings for PETG:
Nozzle temperature: 230℃-250℃
Hotbed temperature: 70℃–75℃.
Fan: OFF or lower speed
As we see from above values, to print PETG, we need higher temperatures. And these temperatures offset within 20℃. That’s because different PETG filaments from different manufacturers or even from the same manufacturer of different colors or different production dates may have different features. So the printing temperatures vary accordingly.
To get the right printing temperatures for specific PETG filament, we need to print below temperature tower with the PETG filament to measure out the exact values.

Temp Tower
Designer: gaaZolee
Thingiverse: 2729076
Tips: When printing the tower, set the parameters according to the recommendation in the link and use appropriate slicer to do it.
By printing the tower, we get more accurate temperature settings for the nozzle and the hotbed; but still we need to avoid setting the hotbed temperature lower than 70℃ to prevent warping or the printed object striping off from the bed. If we set the bed temperature among 65℃-70℃ according to the test result of temp tower printing, then we should apply some glue or tape onto the bed to prevent unexpected print failures.
Additionally, don’t forget to set the fan off or operate at lower speed.
Suggested Nozzle / Heatbed Temperature Settings for Different 3D Printing Filaments:
| Filament | Extruder TEMP | Heatbed TEMP | Print speed |
| PLA | 190-220℃ | 50-70ºC | 40-100mm/s |
| ABS | 220-240℃ | 100-125ºC (110ºC is recommended) | 40-100mm/s |
| PCL | 60-100℃ | 35-45℃ | 40-100mm/s |
| TPU | 230-250℃ | 45-60℃ | 40-100mm/s |
| HIPS | 220-240℃ | 80-120℃ | 40-100mm/s |
| PETG | 230-250℃ | 70℃–75℃ | 40-100mm/s |
| PC | 235-270℃ | 100-130ºC (120ºC is recommended) | 40-100mm/s |
| PA | 230-260℃ | 80-120℃ | 40-100mm/s |
| PVA | 190-210℃ | 80-120℃ | 20-40mm/s |
| WOOD | 190-210℃ | 50-70ºC | 20-40mm/s |
| FLEXIBLE | 190-210℃ | 50-70ºC | 20-40mm/s |
Now, let’s see how we can adjust parameter settings for PETG printing on slicer software.
II – PETG Print Cura Settings
| 1. | Layer height | 0.06mm - 0.1mm |
| 2. | Infill | 10-20% |
| 3. | Nozzle temperature | 230-250℃ |
| 4. | Heat bed temperature | 70-75℃ |
| 5. | Retraction | enabled |
| 6. | Fan | OFF or lower speed |
| 7. | Initial layer print speed | 25mm/s |
When print with PETG, we should adjust some parameters on slicing software accordingly. Here we take Cura as an example.
- Set layer height at 0.06mm; if want to speed up the printing, this value can be increased a little but not higher than 0.1mm.
- Infill value can adjust according to your requirement.
- For high speed printing, set infill to 10% or lower
- For delicate components printing, set infill to 20%
- For tool printing, set infill to 100% for reliabilities.
- Adjust both nozzle and hotbed temperature according to temp tower print result; as we tested, hotbed temperature should be set among 70℃-75℃.
- Enable retraction and set retraction distance at 7 to avoid oozing.
- When set hotbed temperature to below 70℃ according to temp tower printing, we can apply some glue or tape onto the hotbed, or set adhesion type to raft to enhance first layer addition and easy removal of the printed model.
- And as mention in previous paragraph, find the “Cooling” option in slicer settings and set the fan off or operate at lower speed to further ensure high temperature needed for PETG printing. “Cooling” setting can also be adjusted while printing.

-
Another important factor for PETG printing is the “Initial Layer Speed” setting. According to our test, the default value on Cura (see below picture) fits PETG printing. No change should be done here.

Follow above guidance and adjust the print settings, and then we can print PETG with Anet ET series 3D printer very well.
And here is our recommend cura profile for PETG printing on Anet ET4, ET4X, ET4 Pro:
https://drive.google.com/file/d/14vLigPslZ_QYepNnOewBDryU1NciKsfN/view?usp=sharing
And PETG print Cura settings for Anet ET5, ET5X, ET5 Pro:
https://drive.google.com/file/d/1aUJ_6W19cnOPsqbjZC6sJ8ClMzJc74Ey/view?usp=sharing
What is ideal to be printed with PETG?
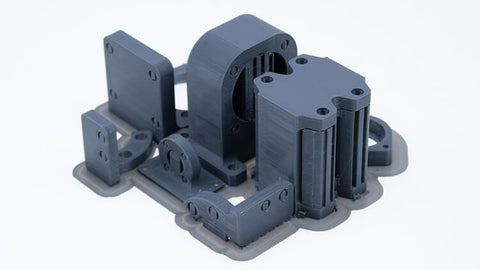
With all these advantages and properties we have mentioned above, PETG is a good candidate when you want to print something tough, durable, flexible and impact-resistant, such as 3D printing outdoor applications, mechanical parts and robotics.
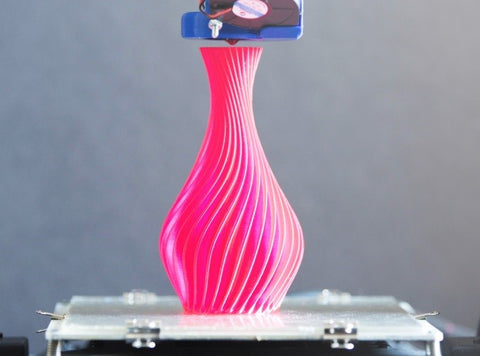
The smooth finish and transparent color of PETG prints makes PETG suitable for 3D printing creative artwork like bracelets and rings.
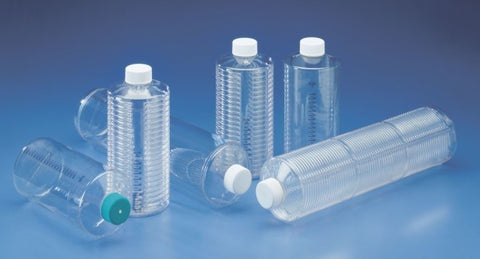
Due to the property of acidic and alkali resistance and the fact that PETG is FDA-compliant, the material is also can be used to 3D print kitchenware or food package.
Ok, that’s all the content about PETG printing on Anet ET4 series 3D printer. Actually we only need to find out the accurate printing temperatures (commonly higher than PLA printing) for specific PETG filament, and then adjust temperature and some other settings according to the guidance. It’s quite easy, isn’t it?
Comments
Leave a comment