
Manual Guide of Anet ET4 and ET5 Series Printers
Credit to Arthur Whittam
Printing Process for the First Print" Control Guide
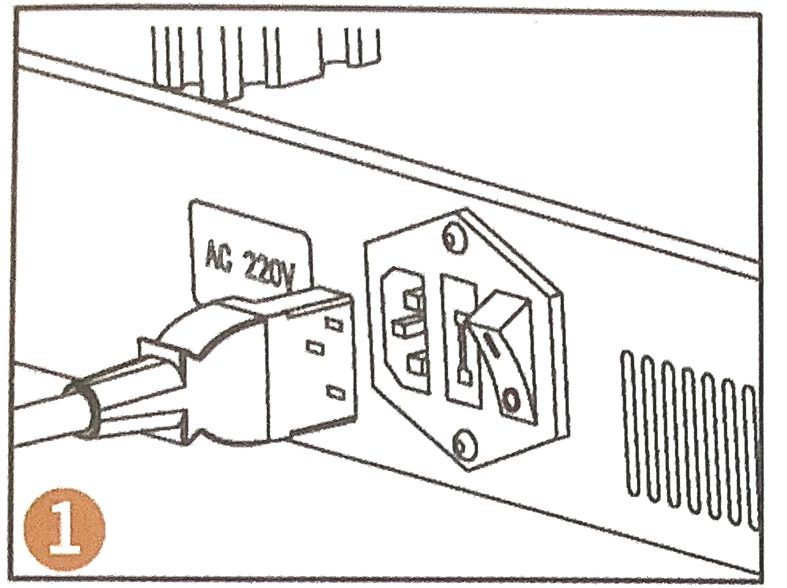
Check the power supply. (Pic 1) Plug the power cable into an outlet.
Turn on the printer.
Home the printing head. (Setting) Leveling - Load filament. (Prepare) (Pic5 ) Slice STL file – (save G-Code to SD card) Insert the SD card into Printer receptor Heat Bed and Nozzle - starting Printing. (Print) Print Ended - Remove the model, when cold. Power off.
Levelling Preparation
CD after assembling the machine, tighten the vertical rods on both sides by hand under the printer power off. Horizontally observe the distance between the build plate and nozzle, making sure there is a small gap between the tip of the nozzle and the top of the build plate for you to place a piece of A4 paper in between of them (Pic2).

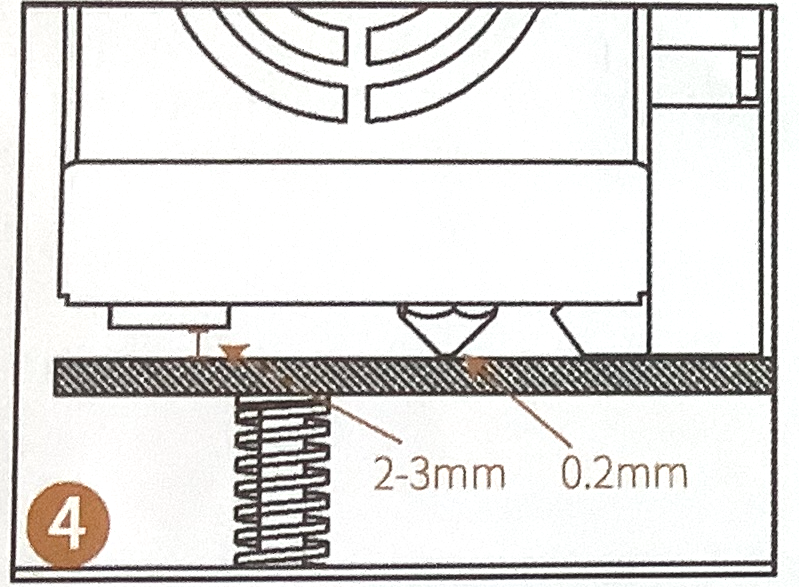
Make the sensor head about 2-3mm away from the platform, (slightly above than the thickness of the ruler). (Pic 4)
Measure the left end point of X-axis to the bottom control base and the right end point with the ruler in the package. Adjust the distance until the distance of the two ends of-axis to the bottom base basically consistent.
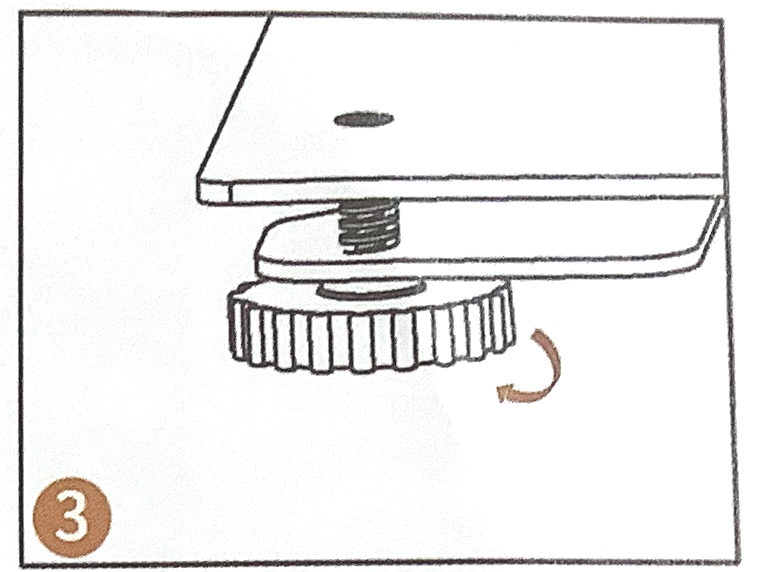
Rotate the four knobs at the bottom of the printing platform (Pic 3) until the four vertices of the printing platform and the bottom base is horizontally consistent. The printer has been leveled before shipping, users only need to have some adjustment.
2. Auto Leveling (use, Auto or Manual Leveling)
Turn on the printer. Tap Settings > Manual > Home - this will home the extruder.
Tap Prepare Leveling > Auto Leveling > Yes The printer checks 5 x 5 points auto leveling.
The screen only displays 3 x 3 points.
The auto leveling process takes approximately 6 minutes.
Tap the “OK” on the pop-up interface to end the leveling.
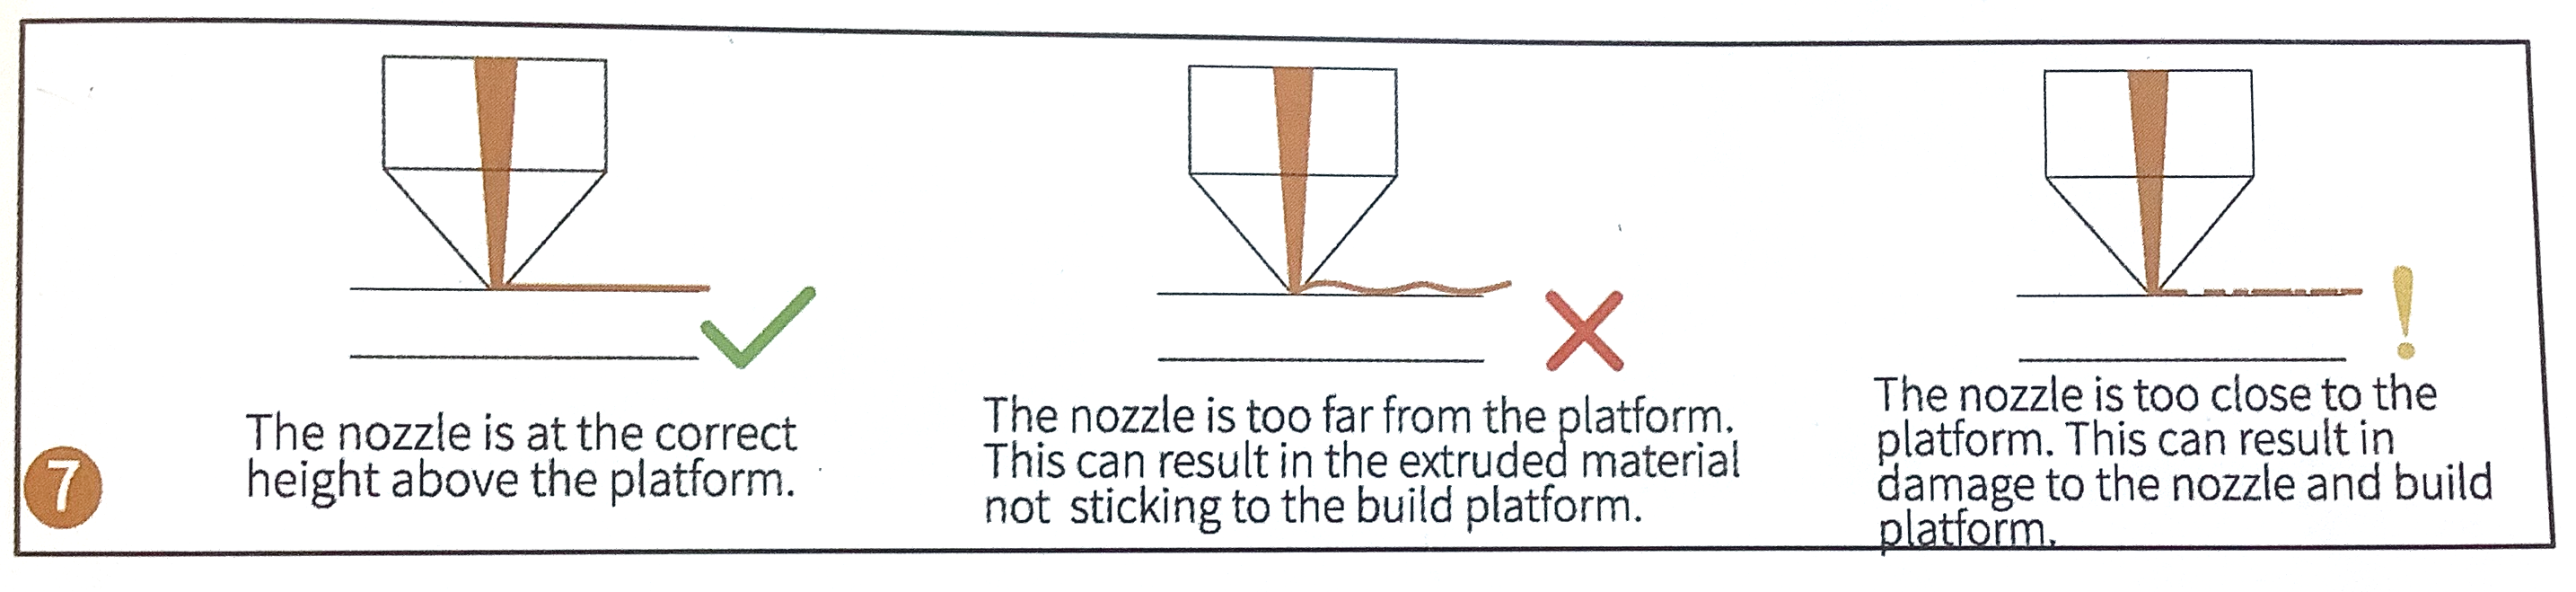
Tap the “OK” key on the leveling interface to check the distance between the nozzle and the platform, which should b exactly the thickness of a piece of A4paper (Pic 2).

If you set - value, the nozzle will begin printing closer to the build plate. If set "+" value, the nozzle will begin printing further from the build plate. Tap “OK” to save the value.
Refer to the images on the to see a successful leveling (Pic 7).
If needed, repeat the above steps until you get a successful first layer.
3. Manual leveling
Power on the printer.
Tap SETTING. Tap Home ( house icon) to home the extruder.
Tap PREPARE > Leveling > tap Manual Leveling and the nozzle will move above the centre of the printing platform.
(NOTE: Firmware updates appear to have removed the need to double tap, Tap once and revert to 2 if 1 fails)
Use + or - to set offset value to adjust the distance between the build plate and nozzle. Make sure there is a small gap between the tip of the nozzle and the top of the build plate for you to place a piece of A4 paper in between of them (thickness of a piece of A4 paper (Pic 2).

Refer to the image below to see a successful leveling (Pic 7).

Then select the leveling point No:1. The nozzle will move above the point that selected. Make sure the distance between the build plate and nozzle is exactly the thickness of a piece of A4 paper by adjusting the leveling knob underneath the platform (Pic 2 ) Accordingly leveling the other bed corner points, 2,3,and 4Refer to the images on bottom of previous page to see a successful leveling (Pic 7).
If needed, repeat the above steps until you get a successful first layer print.
4. Load Filament
Use Anet 1.75mm PLA filament.
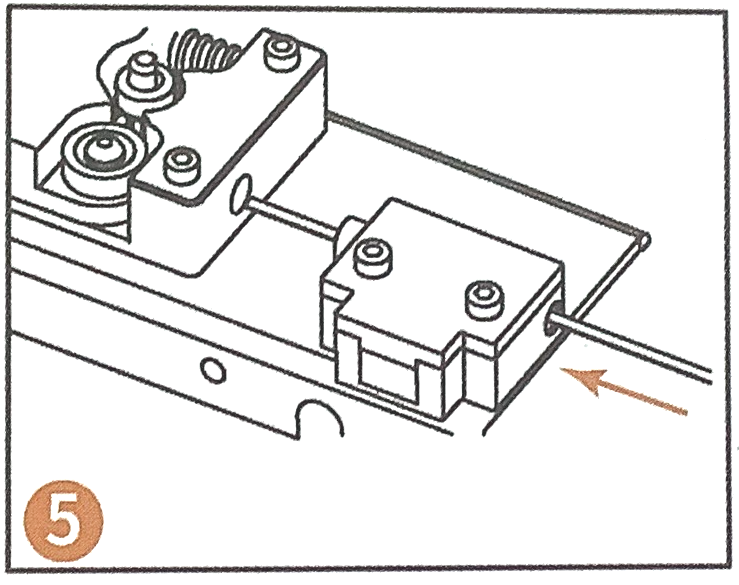
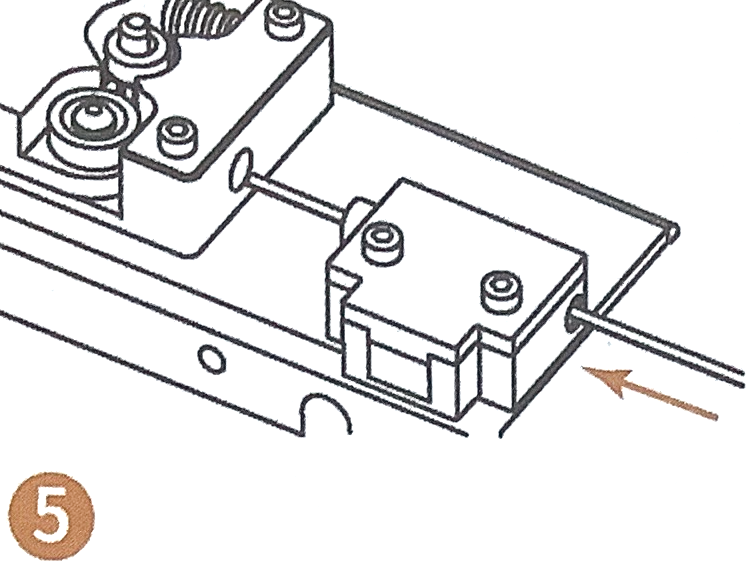
Neatly trim the end of the filament and feed the filament through the filament detector to the extruder. (Pic 5)
Load Filament: Tap PREPARE > Filament > Load, the printer will begin to load the filament once the extruder reaches the set temperature.
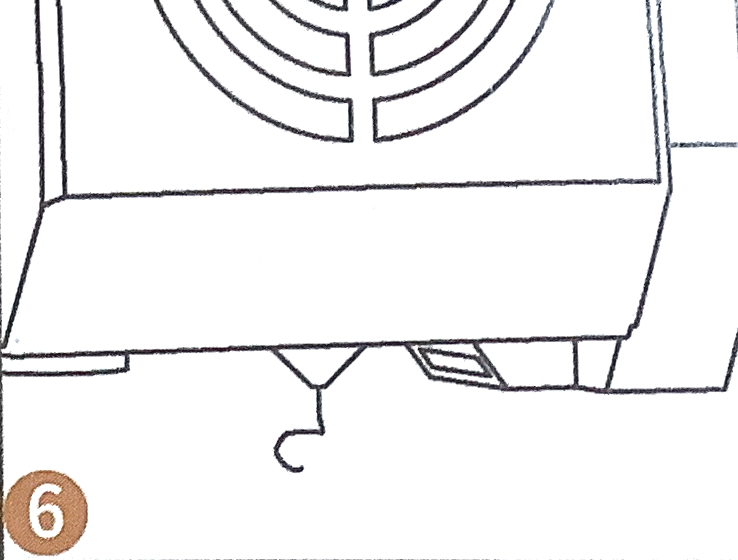
If the printer works properly, you will find an evenly xtruded filament coming out of the nozzle. (Pic 6)
If no filament come out from the extruder, please click load button again. And check the filament is passing into the feed tube.
Unload Filament: Tap PREPARE > Filament > Unload. The printer will begin to unload the filament once the extruder reaches the temperature and will stop when all the filament is unloaded.
5. Print
Save the print gCode file on the SD card.
Insert the TF card into the slot on the left side of the printer.
Select the file you wish to print on the touch screen.
Tap PRINT Select the file the file using Up / Down Arrow > tap OK and then the print will begin.
When the print has finished, wait for the build plate to cool down and remove the model from the build plate
6. Changing Filament
If you need to change filament, first stop the print job, and change filament on the “CH Fila” interface.
Please refer to the steps of Load Filament.
Quick Guide to AUTO LEVEL
STEP 1: Go to the settings and tap the HOME icon.
Once the extruder stops at “home”, it is OK to set the Auto Level.
Heat the bed to 60c. Never rely on Manual or Auto Level being carried out with a cold bed.
Tap the Auto Level, a pop up asks you to confirm. Tap YES.
The auto level will calculate a multi point mesh which will compensate for uneven area’s in the bed, although the display shows just nine.
The offset you will adjust to set the nozzle height for proper printing and that is Z OFFSET.
I adjust the Z offset down (-) until I cannot slide the A4 paper, then bring it up using (+) one notch 0.01mm, until the Paper can be moved, but still touching the nozzle. If the nozzle is too high or low, use the + or - to adjust the offset till you are satisfied.
A good test is to use the XYZ Cube with a brim. If the brim looks good continue printing. If the brim is not looking good you have the option to kill the print and adjust the Z level.
Once set as long as you do not move any of the leveling screws you are good. No need to change it each time you power on.
However, you will need to run the Auto Level every time you power on since the mesh is not saved when you power off. Remember to heat the bed
Uploading Firmware updates the micro SD cards.
You are advised to keep one SD card only for uploading Firmware.
Ensure the SD card is NOT holding other files. It must be “clean”.
Format the SD card before saving new updated firmware.
When doing a simple format, not all the data is removed.
In mac OS or Windows, find the option that allows turning on....”see hidden files”. Delete any files seen and reformat. After second format you format, check the content of the card. There should be nothing to see.
If you have multi choice of format type...quick format and full wipe format....do NOT use quick format. Whatever the wording on your computer, you need a full format to remove all data. Any data left on the card...is what causes the problem and prevents a clean update.
Is my AL Sensor working OK ?
If you doubt the AL sensor below is a check guide.
STEP 1: Raise the Z axis about 40mm. Look at the top of the level sensor. Touch the bottom with your finger and if the LED on the top of the sensor lights up then it is working. Proceed to Step 2.
STEP 2: Lower the nozzle to the bed Go to Settings and turn off the motors. That's the M with a circle. Move the bed and the hot end to the middle. Turn the Z stepper coupling and place the nozzle just barely touching the glass bed. If you. Listen closely you will hear when it touches the bed. Proceed to Step 3.
STEP 3: Adjust the sensor sensitivity Check the top of the sensor that is just to the left of the hot end. Is the red LED lit. It should be. If not, turn the screw on the top of the sensor with the supplied screwdriver until it lights up. That's it. Proceed to Step 4.
STEP 4: Establish HOME Go to Settings and press the HOME icon. it should home properly now. At this point you can proceed with Auto Level.
The process will take approximately 6 minutes to complete.
No Need to touch the adjuster bed screws.
Please Note: Auto Level is NOT held in memory. The settings are lost when you turn the printer off, which you will need to do to change SD cards.
The ideal solution is to plan your printing session by adding ALL the model gCode files onto the micro SD card and print individually in a sequence.
DISCLAIMER:
This guide is a revamped version of the Anet Manual / Control Guide.
There are some changes made to firmware etc - since the Printed Anet Manual was produced. At the time of writing this, I do not have an ET4 printer, so have not been able to check everything.
You could get more information and guide of slice software on our official website www.anet3d.com and the supplied flash drive
This guide version is not Official Anet written or supplied to whoever chose to use it. ANY and ALL users of the guide do so AT YOUR OWN RISK.
The text in Anet’s control guide included with each ET series 3D printer has been re written for use in this guide. All images are copyright Anet 3D Printers
Copyright 2020: Anet 3D Printers and ABW-3D.
Clik To DOWNLOAD The PDF
If you have any questions, please feel free to leave comments down below, our guys are waiting to help you. Joining our community is also a good idea, you can get information, model files, g-code files, tutorials and find the enthusiasts as you are. It's a place where creative people gathered, just hit the link: https://forum.anet3d.com/
Leave a comment